> ## Documentation Index
> Fetch the complete documentation index at: https://docs.edgeimpulse.com/llms.txt
> Use this file to discover all available pages before exploring further.
# Data sources
> Connect external storage to a project and automate ingestion with labeling, transformations, schedules, and webhooks.
A data source connects a project to data that lives somewhere else, such as a cloud storage bucket, an organizational dataset, or an [upload portal](/studio/organizations/upload-portals), and keeps pulling from it on a schedule.
A data source is a **pipeline**: an ordered list of steps where the first step fetches data into the project, and the steps after it act on the project once the new data has landed. New data can arrive, retrain the model, and build a fresh deployment without anyone opening the Studio.
## What happens on each run
A pipeline run has three steps:
1. **The import step fetches data** from the source you configured, labeling each sample according to the strategy you chose.
2. **The post-sync actions run** against the project, in the order they appear in the pipeline. These are ordinary Studio operations, so retraining here is the same retraining you would trigger by hand.
3. **The run is reported**, by email and optionally to a webhook, including how many new items arrived.
Keep in mind:
* **Building a deployment requires retraining.** Enable the retrain action as well, because otherwise there is no new model to build from.
* **Retraining requires the project to have been trained at least once**, since the pipeline reuses the existing impulse rather than designing one.
* **A run that imports nothing still runs the actions you enabled.** Check the new item count in the notification to tell an empty run from a broken one.
For the first run, set **Prefix** to a small folder in your bucket rather than the whole bucket. Labels are assigned at import time, so if the labeling strategy is wrong, only a few samples need fixing. Once the labels look right, widen the `path` in the [pipeline configuration](#edit-your-pipeline).
#### Run transformation jobs directly from your projects
You can also trigger cloud jobs, known as [transformation blocks](/studio/organizations/custom-blocks/custom-transformation-blocks), these are particularly useful if you want to generate synthetic datasets or automate tasks using the Edge Impulse API. We provide several pre-built transformation blocks available for organizations' projects:
* [DALL-E 3 Image Generation Block](https://github.com/edgeimpulse/example-transform-Dall-E-images)
* [Whisper Voice Synthesis Block](https://github.com/edgeimpulse/example-transform-whisper-keywords)
* [Find best Visual AD model](https://github.com/edgeimpulse/find-best-fomo-ad-model)
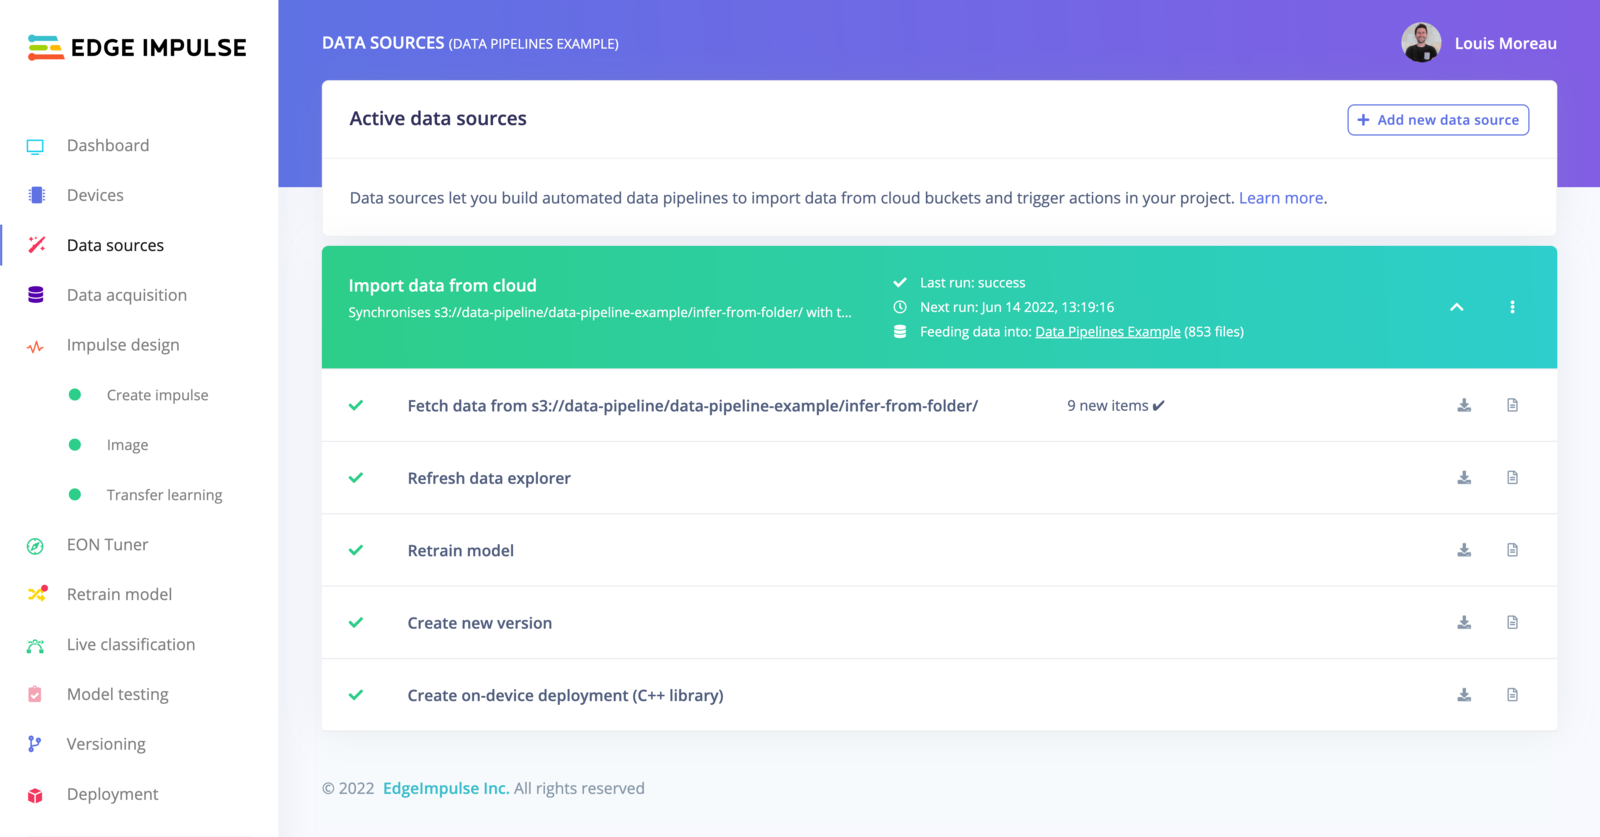 This view, originally accessible from the main left menu, has been moved to the **Data acquisition** tab for better clarity. The screenshots have not yet been updated.
## Add a data source
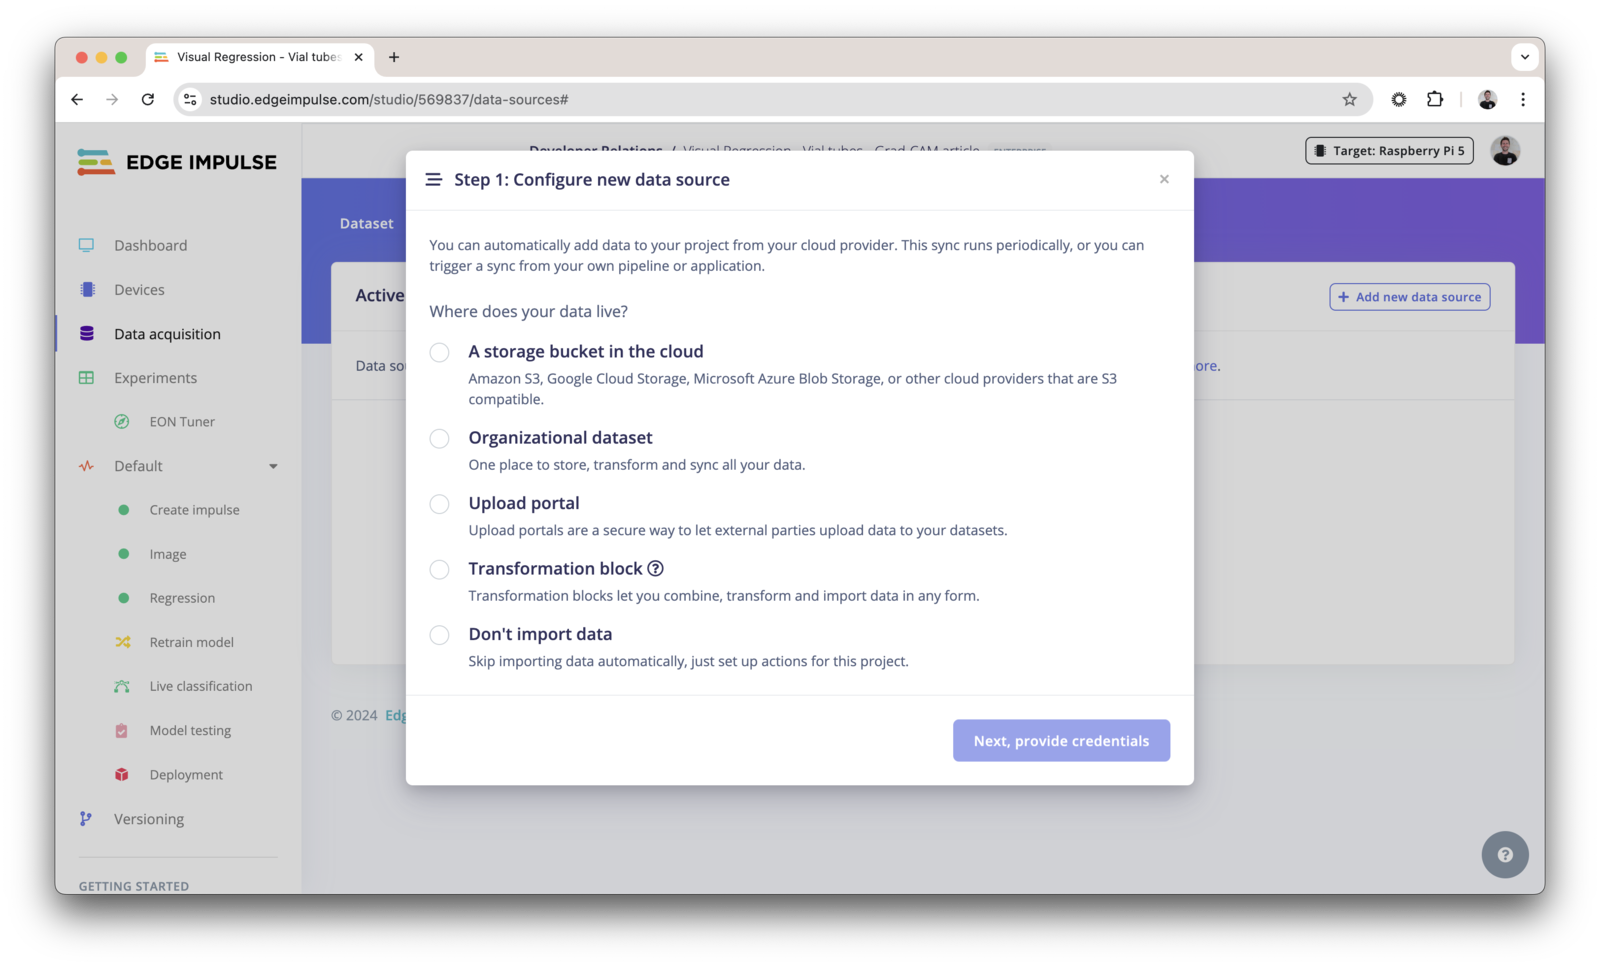
Click in **+ Add new data source** and select where your data lives:
You can either use:
* [Cloud data storage](/studio/organizations/data/cloud-data-storage)
* [Organizational datasets](/studio/organizations/data) (enterprise feature)
* [Upload portals](/studio/organizations/upload-portals) (enterprise feature)
* [Transformation blocks](/studio/organizations/custom-blocks/custom-transformation-blocks) (enterprise feature)
* Don't import data (if you just need to create a pipeline)
This view, originally accessible from the main left menu, has been moved to the **Data acquisition** tab for better clarity. The screenshots have not yet been updated.
## Add a data source
Click in **+ Add new data source** and select where your data lives:
You can either use:
* [Cloud data storage](/studio/organizations/data/cloud-data-storage)
* [Organizational datasets](/studio/organizations/data) (enterprise feature)
* [Upload portals](/studio/organizations/upload-portals) (enterprise feature)
* [Transformation blocks](/studio/organizations/custom-blocks/custom-transformation-blocks) (enterprise feature)
* Don't import data (if you just need to create a pipeline)
 See how to configure your storage buckets:
* [Amazon S3](/studio/organizations/data/cloud-data-storage#amazon-s3-bucket)
* [Microsoft Azure Blob Storage](/studio/organizations/data/cloud-data-storage#microsoft-azure-blob-storage-blob-container)
* [Google Cloud Storage](/studio/organizations/data/cloud-data-storage#google-cloud-storage-bucket)
* or any [S3 compatible storage](/studio/organizations/data/cloud-data-storage#other-s3-compatible-buckets).
Click on **Next, provide credentials**:
See how to configure your storage buckets:
* [Amazon S3](/studio/organizations/data/cloud-data-storage#amazon-s3-bucket)
* [Microsoft Azure Blob Storage](/studio/organizations/data/cloud-data-storage#microsoft-azure-blob-storage-blob-container)
* [Google Cloud Storage](/studio/organizations/data/cloud-data-storage#google-cloud-storage-bucket)
* or any [S3 compatible storage](/studio/organizations/data/cloud-data-storage#other-s3-compatible-buckets).
Click on **Next, provide credentials**:
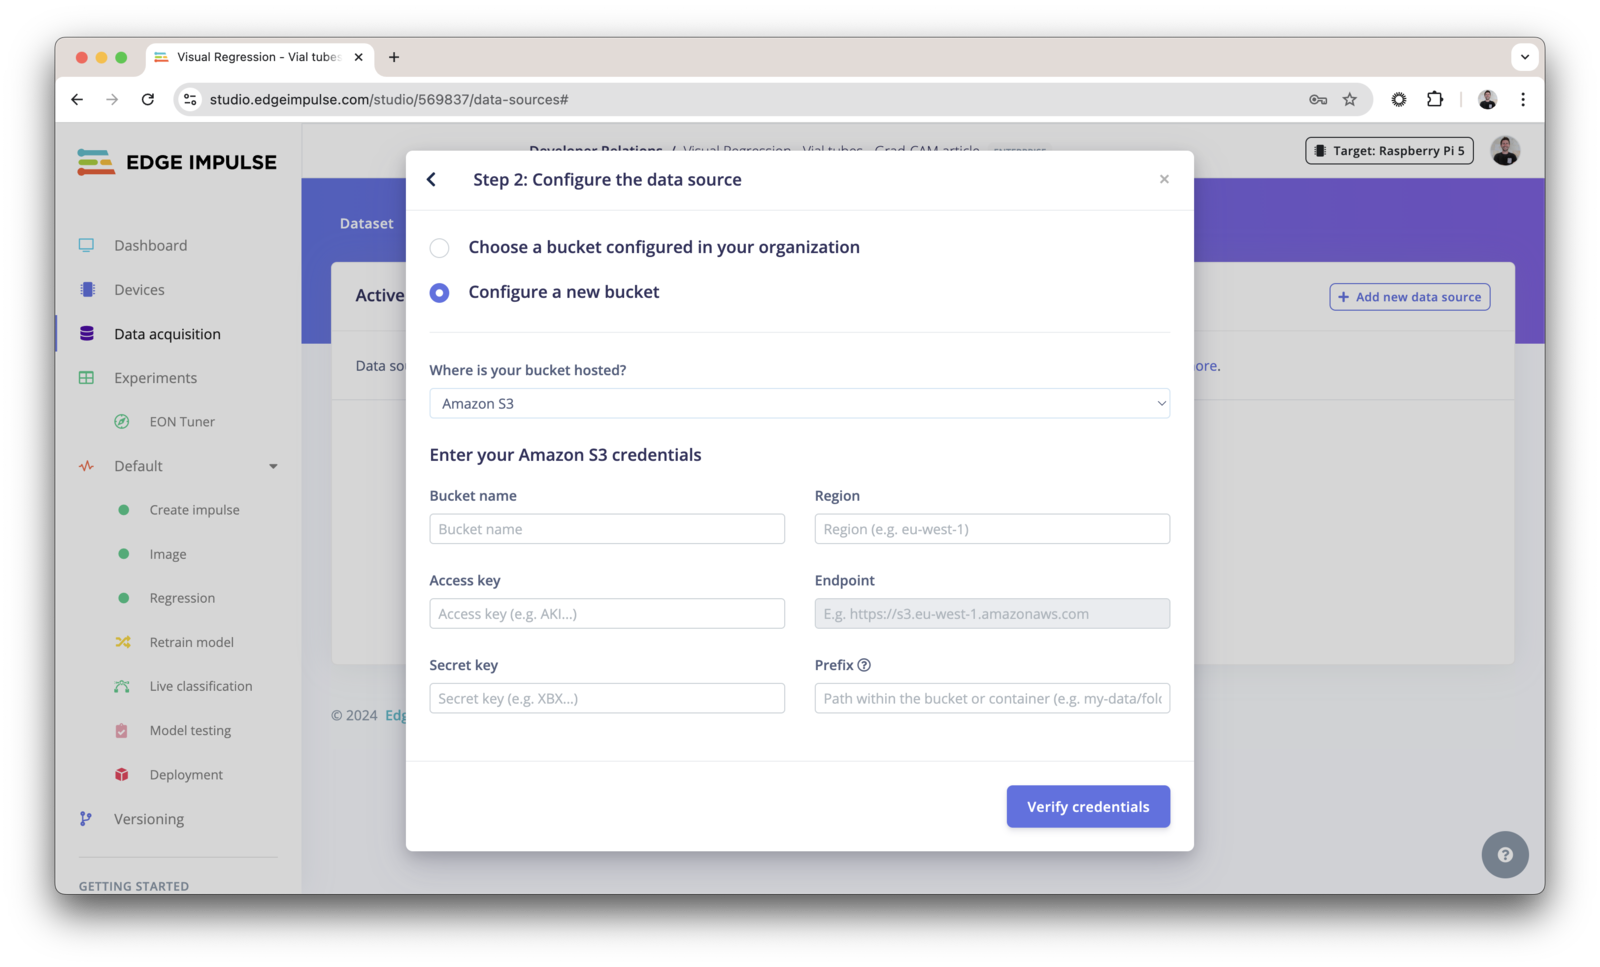 Click on **Verify credentials**:
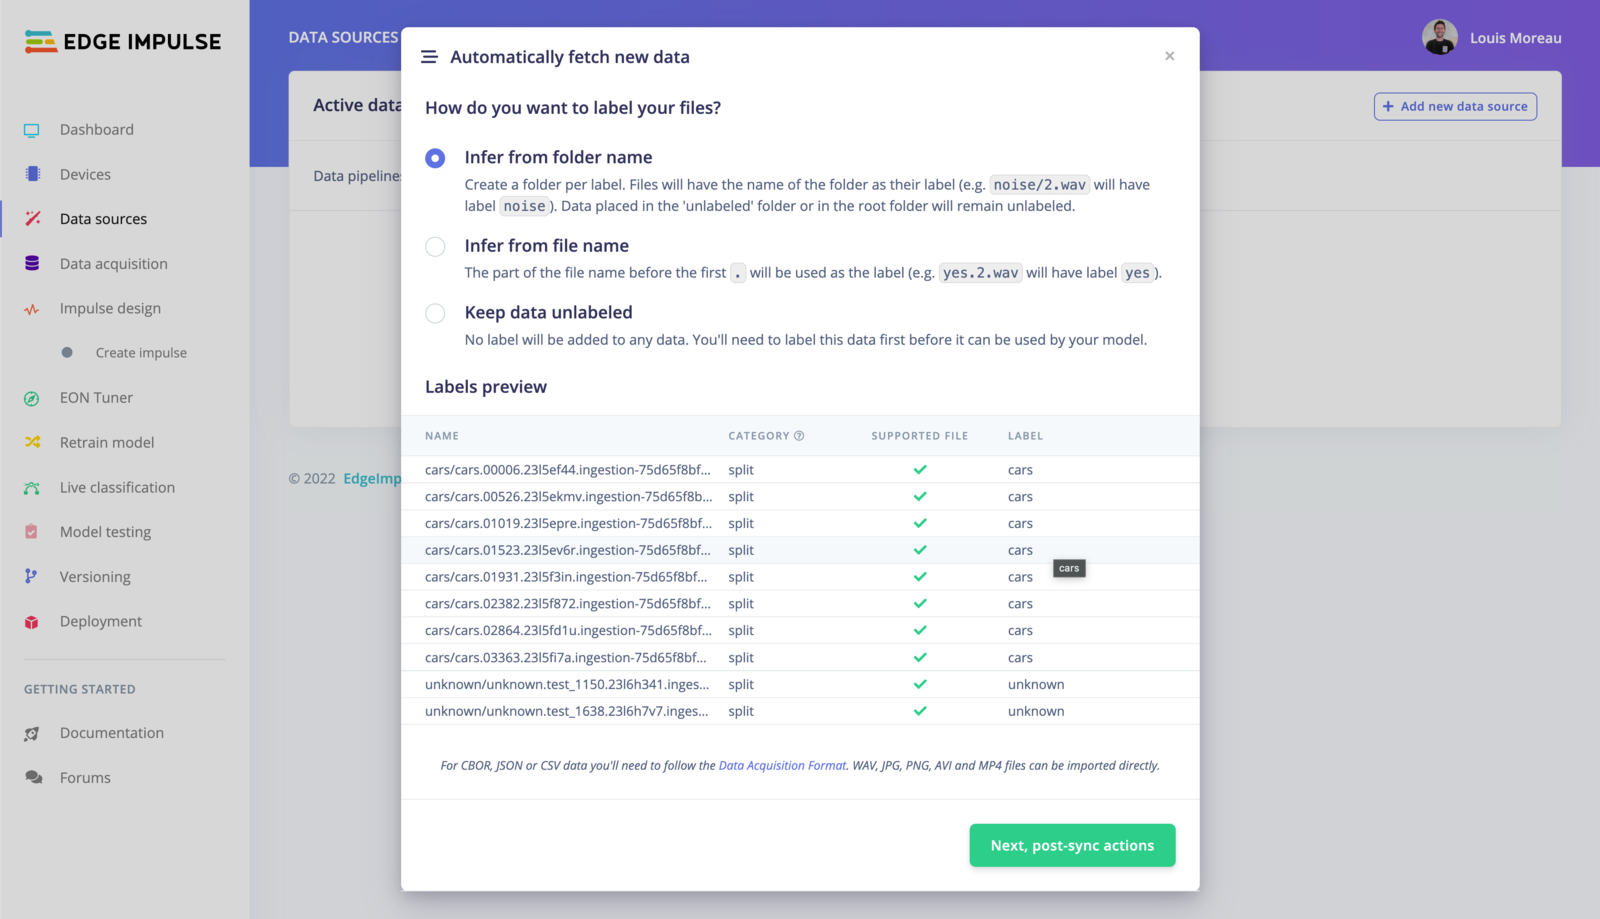 Here, you have several options to automatically label your data:
### Infer from folder name
In the example above, the structure of the folder is the following:
```
.
├── cars
│ ├── cars.01741.jpg
│ ├── cars.01743.jpg
│ ├── cars.01745.jpg
│ ├── ... (400 items)
├── unknown
│ ├── unknown.test_2547.jpg
│ ├── unknown.test_2548.jpg
│ ├── unknown.test_2549.jpg
│ ├── ... (400 items)
└── unlabeled
├── cars.02066.jpg
├── cars.02067.jpg
├── cars.02068.jpg
└── ... (14 items)
3 directories, 814 files
```
The labels will be picked from the folder name and will be split between your **training** and **testing** set using the following ratio `80/20`.
The samples present in an `unlabeled/` folder will be kept unlabeled in Edge Impulse Studio.
Alternatively, you can also organize your folder using the following structure to automatically split your dataset between **training** and **testing** sets:
```
.
├── testing
│ ├── cars
│ │ ├── cars.00012.jpg
│ │ ├── cars.00031.jpg
│ │ ├── cars.00035.jpg
│ │ └── ... (~150 items)
│ └── unknown
│ ├── unknown.test_1012.jpg
│ ├── unknown.test_1026.jpg
│ ├── unknown.test_1027.jpg
│ ├── ... (~150 items)
├── training
│ ├── cars
│ │ ├── cars.00006.jpg
│ │ ├── cars.00025.jpg
│ │ ├── cars.00065.jpg
│ │ └── ... (~600 items)
│ └── unknown
│ ├── unknown.test_1002.jpg
│ ├── unknown.test_1005.jpg
│ └── unknown.test_46.jpg
│ └── ... (~600 items)
└── unlabeled
├── cars.02066.jpg
├── cars.02067.jpg
├── cars.02068.jpg
└── ... (14 items)
7 directories, 1512 files
```
### Infer from file name
When using this option, only the file name is taken into account. The part before the first `.` will be used to set the label. E.g. `cars.01741.jpg` will set the label to `cars`.
### Keep the data unlabeled
All the data samples will be unlabeled, you will need to label them manually before using them.
Finally, click on **Next, post-sync actions**.
Here, you have several options to automatically label your data:
### Infer from folder name
In the example above, the structure of the folder is the following:
```
.
├── cars
│ ├── cars.01741.jpg
│ ├── cars.01743.jpg
│ ├── cars.01745.jpg
│ ├── ... (400 items)
├── unknown
│ ├── unknown.test_2547.jpg
│ ├── unknown.test_2548.jpg
│ ├── unknown.test_2549.jpg
│ ├── ... (400 items)
└── unlabeled
├── cars.02066.jpg
├── cars.02067.jpg
├── cars.02068.jpg
└── ... (14 items)
3 directories, 814 files
```
The labels will be picked from the folder name and will be split between your **training** and **testing** set using the following ratio `80/20`.
The samples present in an `unlabeled/` folder will be kept unlabeled in Edge Impulse Studio.
Alternatively, you can also organize your folder using the following structure to automatically split your dataset between **training** and **testing** sets:
```
.
├── testing
│ ├── cars
│ │ ├── cars.00012.jpg
│ │ ├── cars.00031.jpg
│ │ ├── cars.00035.jpg
│ │ └── ... (~150 items)
│ └── unknown
│ ├── unknown.test_1012.jpg
│ ├── unknown.test_1026.jpg
│ ├── unknown.test_1027.jpg
│ ├── ... (~150 items)
├── training
│ ├── cars
│ │ ├── cars.00006.jpg
│ │ ├── cars.00025.jpg
│ │ ├── cars.00065.jpg
│ │ └── ... (~600 items)
│ └── unknown
│ ├── unknown.test_1002.jpg
│ ├── unknown.test_1005.jpg
│ └── unknown.test_46.jpg
│ └── ... (~600 items)
└── unlabeled
├── cars.02066.jpg
├── cars.02067.jpg
├── cars.02068.jpg
└── ... (14 items)
7 directories, 1512 files
```
### Infer from file name
When using this option, only the file name is taken into account. The part before the first `.` will be used to set the label. E.g. `cars.01741.jpg` will set the label to `cars`.
### Keep the data unlabeled
All the data samples will be unlabeled, you will need to label them manually before using them.
Finally, click on **Next, post-sync actions**.
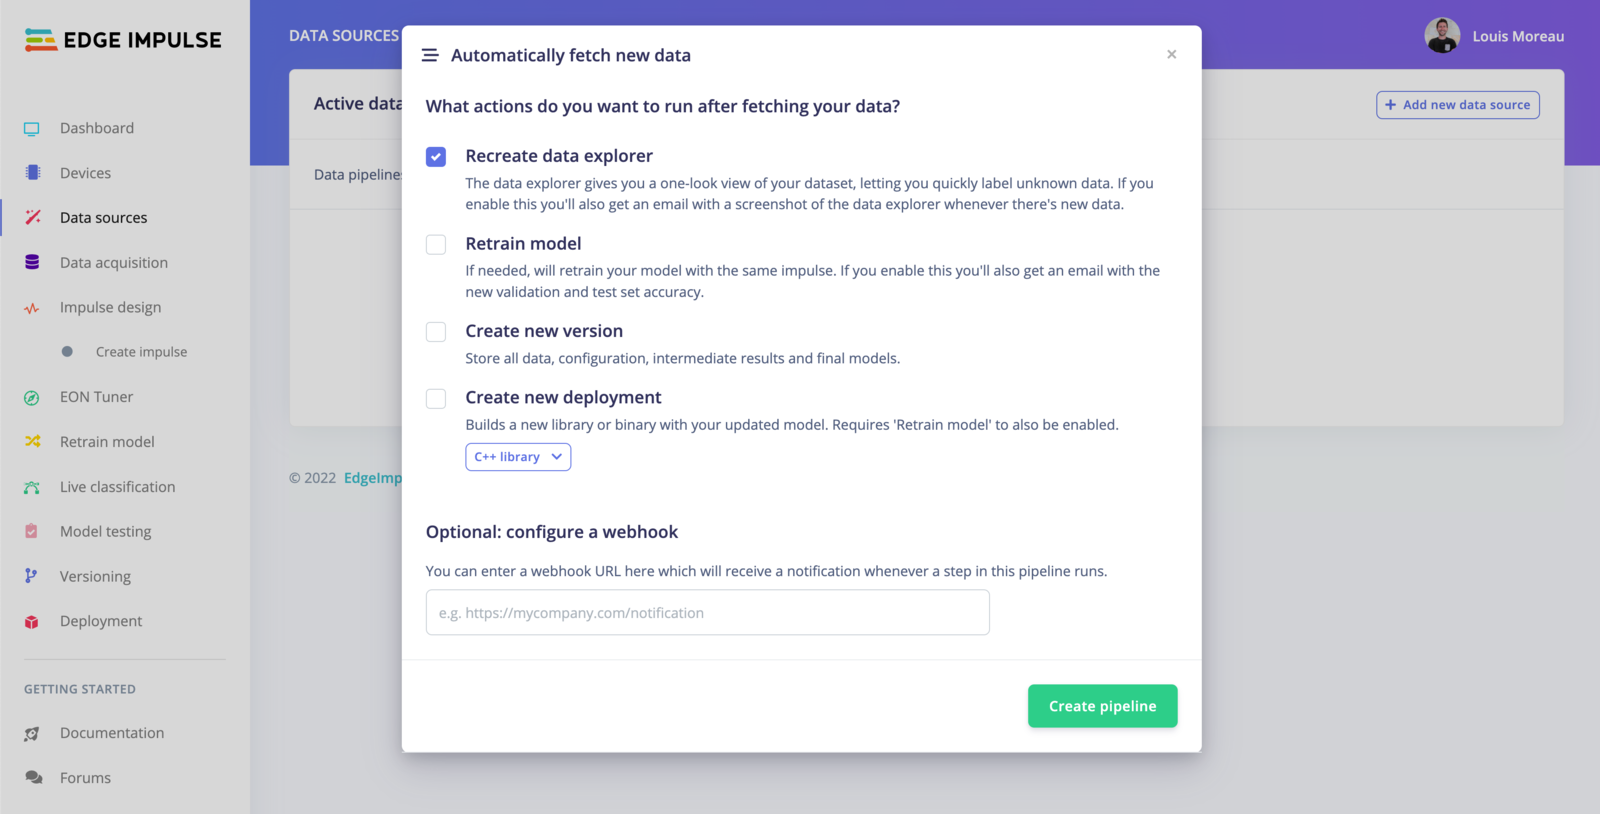 From this view, you can automate several actions:
* **Recreate data explorer**
The [data explorer](/studio/projects/data-acquisition/data-explorer) gives you a one-look view of your dataset, letting you quickly label unknown data. If you enable this you'll also get an email with a screenshot of the data explorer whenever there's new data.
* **Retrain model**
If needed, will retrain your model with the same impulse. If you enable this you'll also get an email with the new validation and test set accuracy.
*Note: You will need to have trained your project at least once.*
* **Create new version**
Store all data, configuration, intermediate results and final models.
* **Create new deployment**
Builds a new library or binary with your updated model. Requires 'Retrain model' to also be enabled.
## Run the pipeline
Once your pipeline is set, you can run it directly from the UI, from external sources or by scheduling the task.
From this view, you can automate several actions:
* **Recreate data explorer**
The [data explorer](/studio/projects/data-acquisition/data-explorer) gives you a one-look view of your dataset, letting you quickly label unknown data. If you enable this you'll also get an email with a screenshot of the data explorer whenever there's new data.
* **Retrain model**
If needed, will retrain your model with the same impulse. If you enable this you'll also get an email with the new validation and test set accuracy.
*Note: You will need to have trained your project at least once.*
* **Create new version**
Store all data, configuration, intermediate results and final models.
* **Create new deployment**
Builds a new library or binary with your updated model. Requires 'Retrain model' to also be enabled.
## Run the pipeline
Once your pipeline is set, you can run it directly from the UI, from external sources or by scheduling the task.
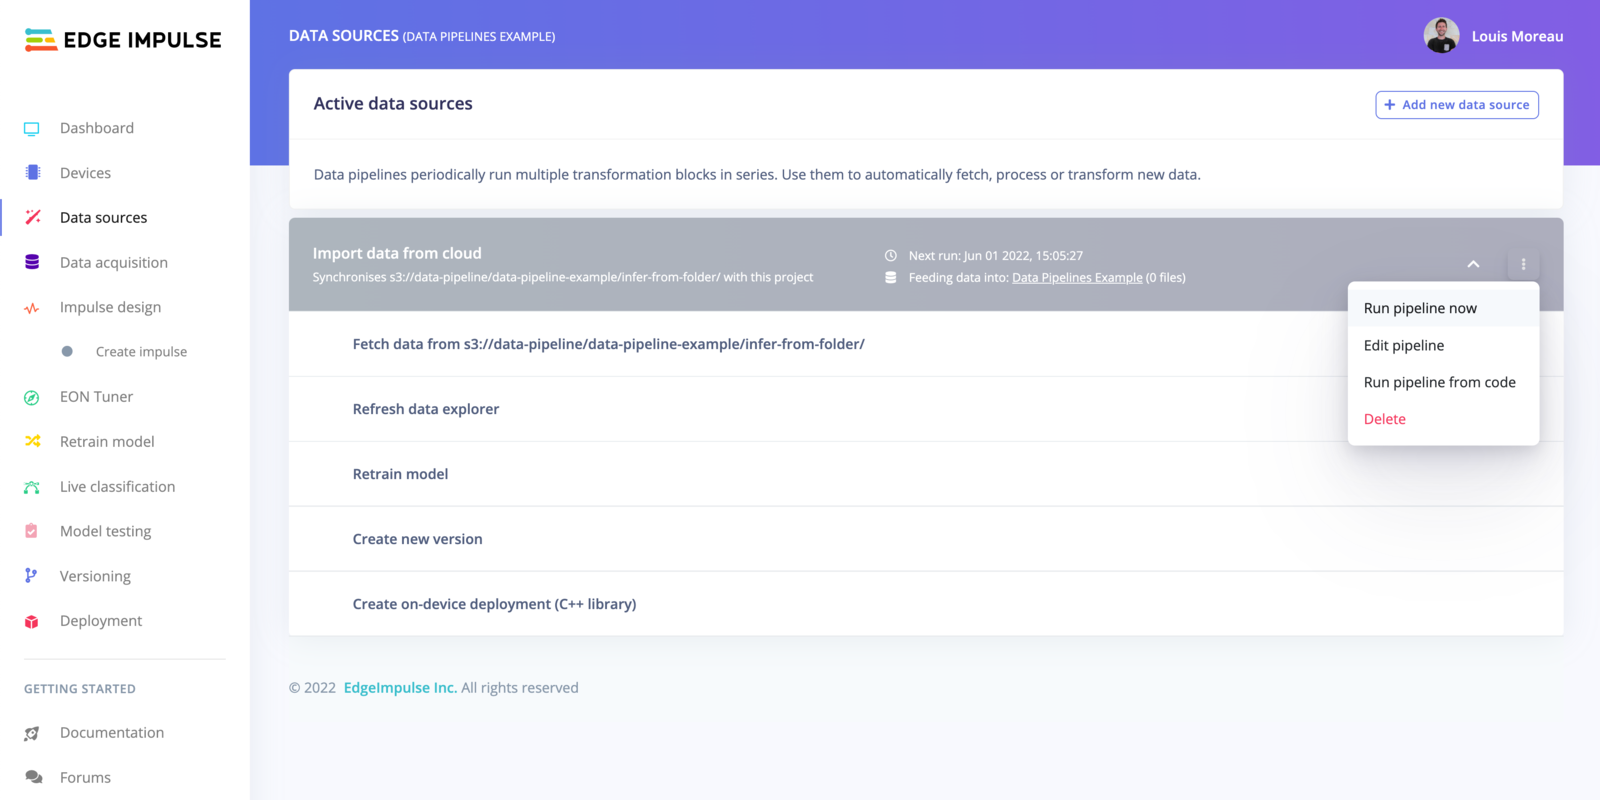 ### Run the pipeline from the UI
To run your pipeline from Edge Impulse studio, click on the `⋮` button and select **Run pipeline now**.
### Run the pipeline from code
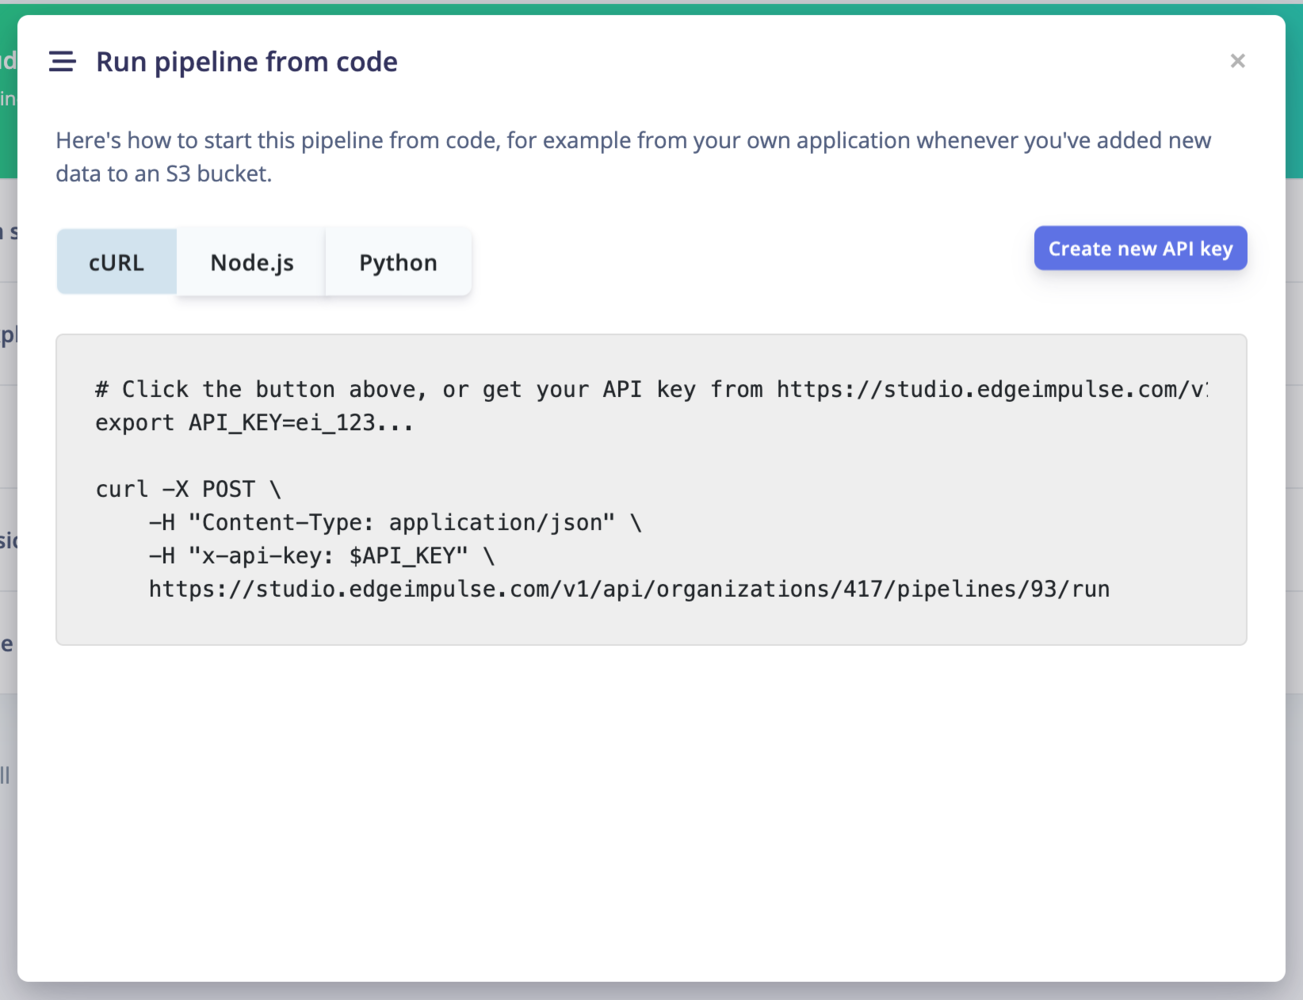
To run your pipeline from Edge Impulse studio, click on the `⋮` button and select **Run pipeline from code**. This will display an overlay with `curl`, `Node.js` and `Python` code samples.
You will need to create an **API key** to run the pipeline from code.
### Run the pipeline from the UI
To run your pipeline from Edge Impulse studio, click on the `⋮` button and select **Run pipeline now**.
### Run the pipeline from code
To run your pipeline from Edge Impulse studio, click on the `⋮` button and select **Run pipeline from code**. This will display an overlay with `curl`, `Node.js` and `Python` code samples.
You will need to create an **API key** to run the pipeline from code.
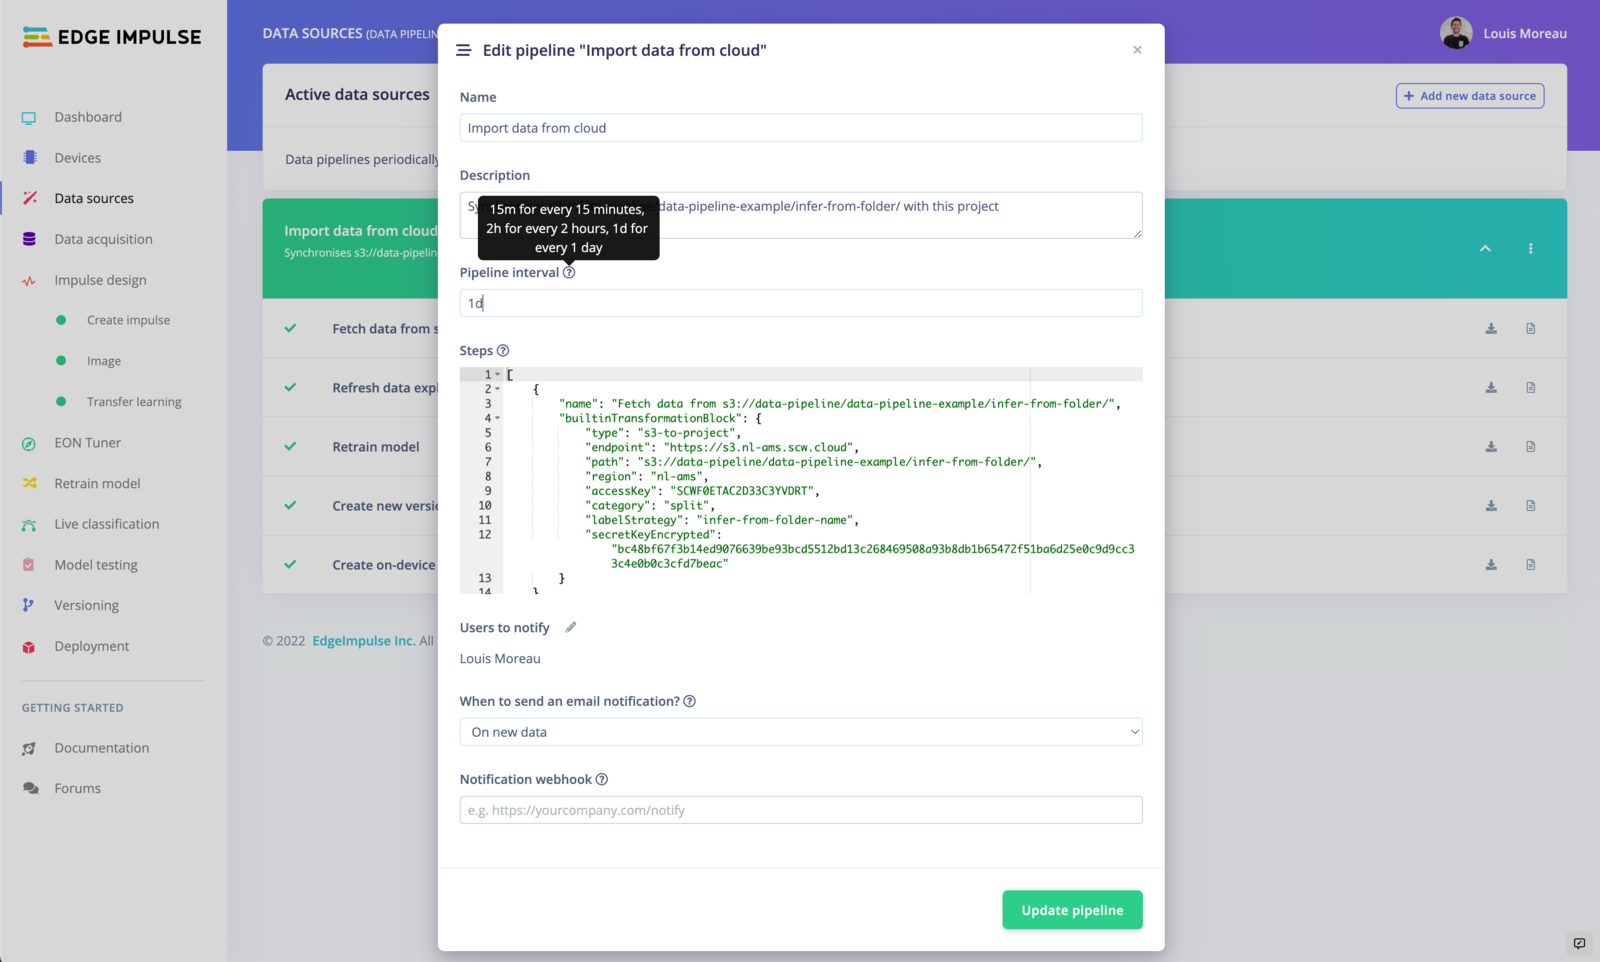
 ### Schedule your pipeline jobs
By default, your pipeline will run every day. To schedule your pipeline jobs, click on the `⋮` button and select **Edit pipeline**.
Free users can only run the pipeline every 4 hours. If you are an enterprise customer, you can run this pipeline up to every minute.
### Schedule your pipeline jobs
By default, your pipeline will run every day. To schedule your pipeline jobs, click on the `⋮` button and select **Edit pipeline**.
Free users can only run the pipeline every 4 hours. If you are an enterprise customer, you can run this pipeline up to every minute.
 Once the pipeline has successfully finish, you will receive an email like the following:
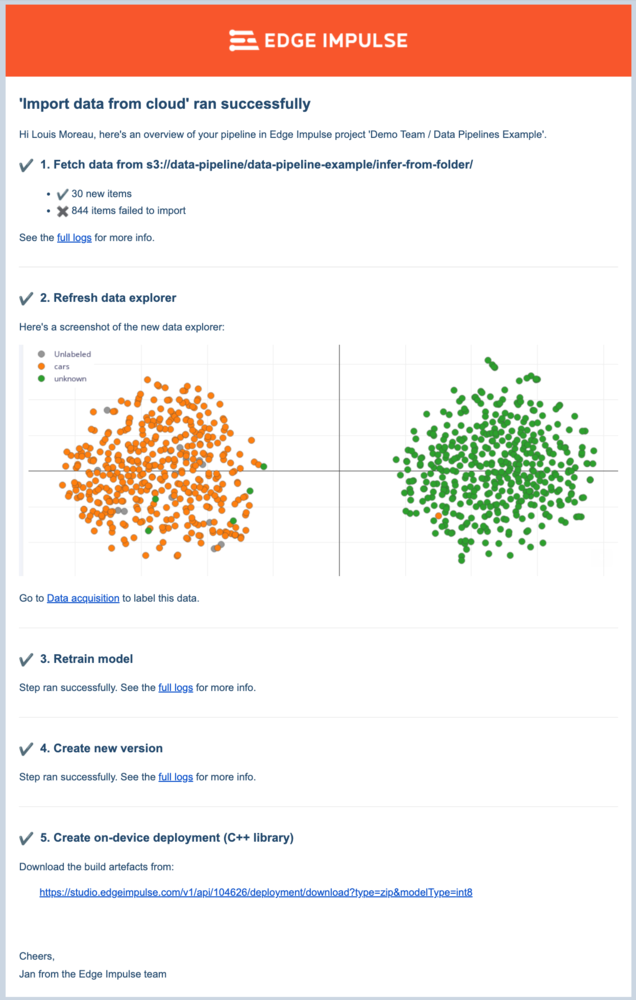 You can also define who can receive the email. The users must be collaborators on your project. See [Collaboration](/studio/projects/dashboard#collaboration).
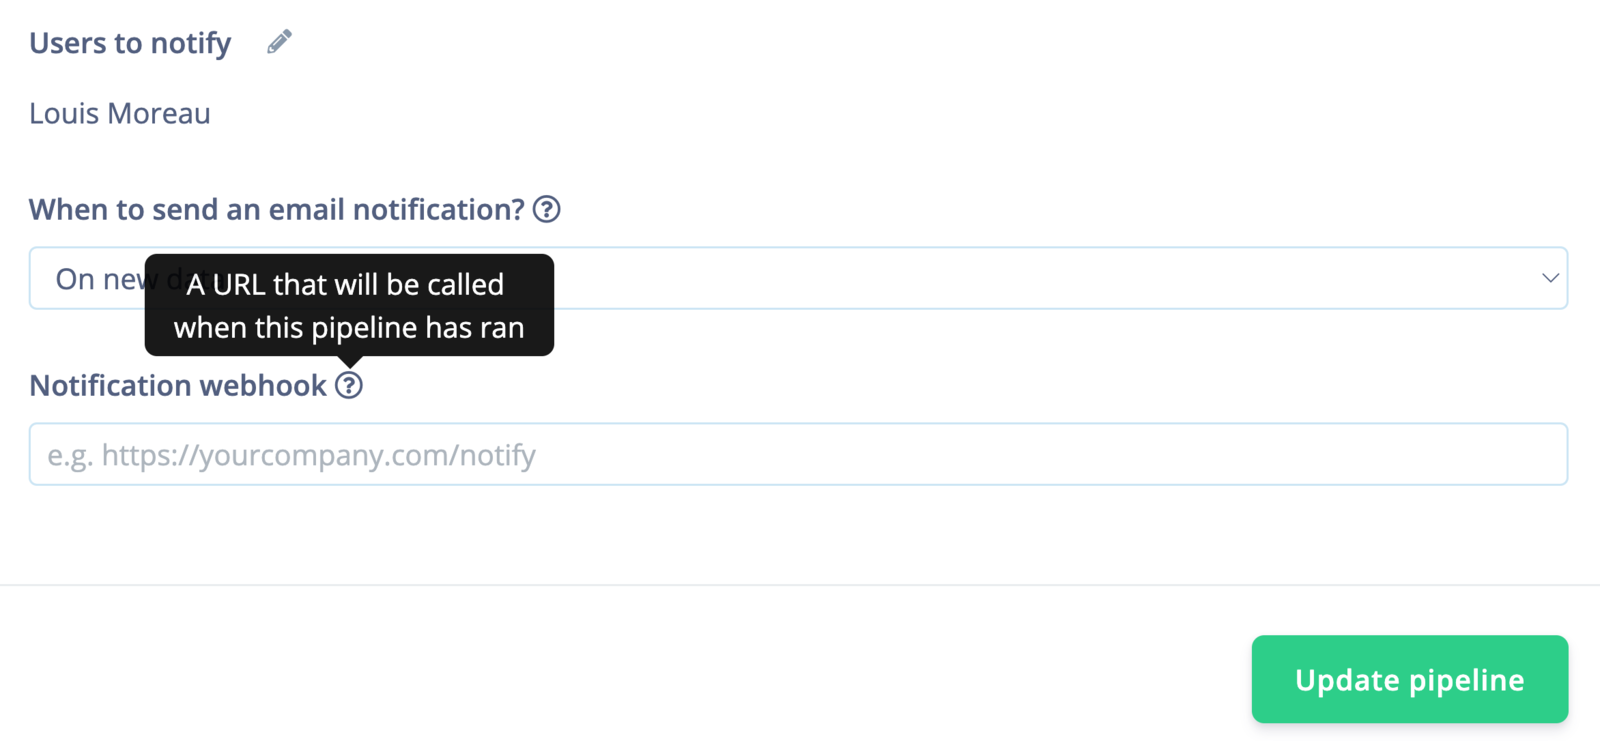
### Webhooks
You can also create a **webhook** to call a URL when the pipeline has run. It will run a POST request containing the following information:
```
{
"organizationId":XX,
"pipelineId":XX,
"pipelineName":"Import data from portal \"Data sources demo\"",
"projectId":XXXXX,
"success":true,
"newItems":0,
"newChecklistOK":0,
"newChecklistFail":0
}
```
`success` reports whether the run completed and `newItems` the number of samples added. Several runs in a row with zero new items can mean a broken credential or a wrong path. The checklist counters report how many incoming items passed or failed the dataset checklist, for sources that have one.
You can also define who can receive the email. The users must be collaborators on your project. See [Collaboration](/studio/projects/dashboard#collaboration).
### Webhooks
You can also create a **webhook** to call a URL when the pipeline has run. It will run a POST request containing the following information:
```
{
"organizationId":XX,
"pipelineId":XX,
"pipelineName":"Import data from portal \"Data sources demo\"",
"projectId":XXXXX,
"success":true,
"newItems":0,
"newChecklistOK":0,
"newChecklistFail":0
}
```
`success` reports whether the run completed and `newItems` the number of samples added. Several runs in a row with zero new items can mean a broken credential or a wrong path. The checklist counters report how many incoming items passed or failed the dataset checklist, for sources that have one.
 ## Edit your pipeline
To update your pipeline, edit the configuration JSON available in `⋮` -> **Run pipeline from code**.
Here is an example of what you can get if all the actions have been selected:
```
[
{
"name": "Fetch data from s3://data-pipeline/data-pipeline-example/infer-from-folder/",
"builtinTransformationBlock": {
"type": "s3-to-project",
"endpoint": "https://s3.your-endpoint.com",
"path": "s3://data-pipeline/data-pipeline-example/infer-from-folder/",
"region": "fr-par",
"accessKey": "XXXXX",
"category": "split",
"labelStrategy": "infer-from-folder-name",
"secretKeyEncrypted": "xxxxxx"
}
},
{
"name": "Refresh data explorer",
"builtinTransformationBlock": {
"type": "project-action",
"refreshDataExplorer": true
}
},
{
"name": "Retrain model",
"builtinTransformationBlock": {
"type": "project-action",
"retrainModel": true
}
},
{
"name": "Create new version",
"builtinTransformationBlock": {
"type": "project-action",
"createVersion": true
}
},
{
"name": "Create on-device deployment (C++ library)",
"builtinTransformationBlock": {
"type": "project-action",
"buildBinary": "zip",
"buildBinaryModelType": "int8"
}
}
]
```
Free projects have only access to the above `builtinTransformationBlock`.
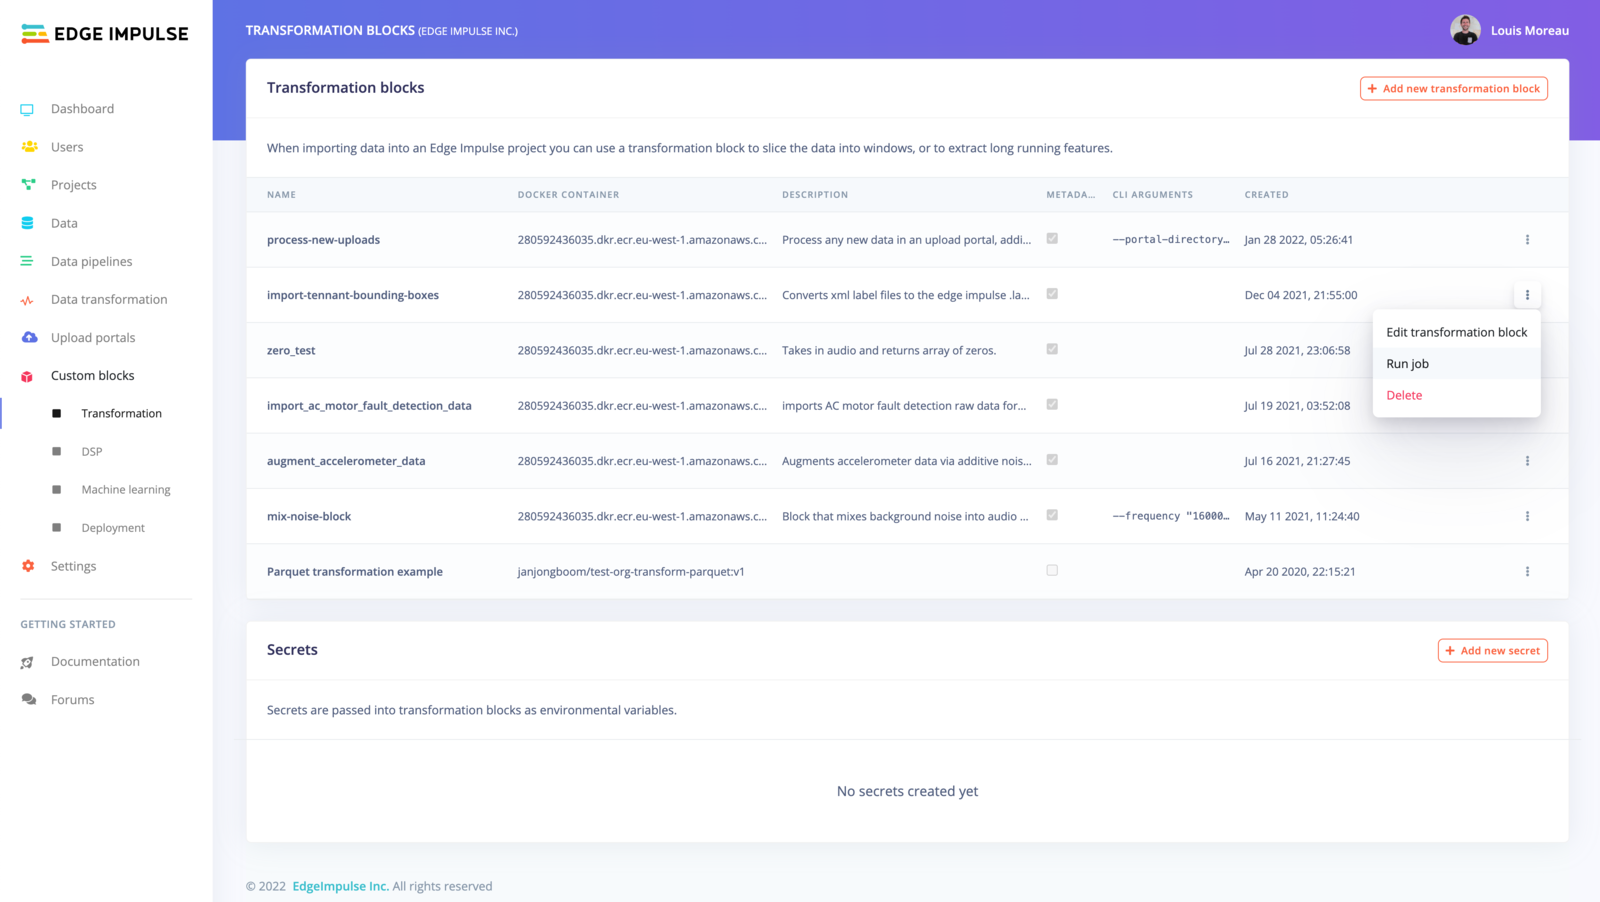
If you are part of an [organization](/studio/organizations/dashboard), you can use your custom transformation jobs in the pipeline. In your organization workspace, go to **Custom blocks -> Transformation** and select **Run job** on the job you want to add.
## Edit your pipeline
To update your pipeline, edit the configuration JSON available in `⋮` -> **Run pipeline from code**.
Here is an example of what you can get if all the actions have been selected:
```
[
{
"name": "Fetch data from s3://data-pipeline/data-pipeline-example/infer-from-folder/",
"builtinTransformationBlock": {
"type": "s3-to-project",
"endpoint": "https://s3.your-endpoint.com",
"path": "s3://data-pipeline/data-pipeline-example/infer-from-folder/",
"region": "fr-par",
"accessKey": "XXXXX",
"category": "split",
"labelStrategy": "infer-from-folder-name",
"secretKeyEncrypted": "xxxxxx"
}
},
{
"name": "Refresh data explorer",
"builtinTransformationBlock": {
"type": "project-action",
"refreshDataExplorer": true
}
},
{
"name": "Retrain model",
"builtinTransformationBlock": {
"type": "project-action",
"retrainModel": true
}
},
{
"name": "Create new version",
"builtinTransformationBlock": {
"type": "project-action",
"createVersion": true
}
},
{
"name": "Create on-device deployment (C++ library)",
"builtinTransformationBlock": {
"type": "project-action",
"buildBinary": "zip",
"buildBinaryModelType": "int8"
}
}
]
```
Free projects have only access to the above `builtinTransformationBlock`.
If you are part of an [organization](/studio/organizations/dashboard), you can use your custom transformation jobs in the pipeline. In your organization workspace, go to **Custom blocks -> Transformation** and select **Run job** on the job you want to add.
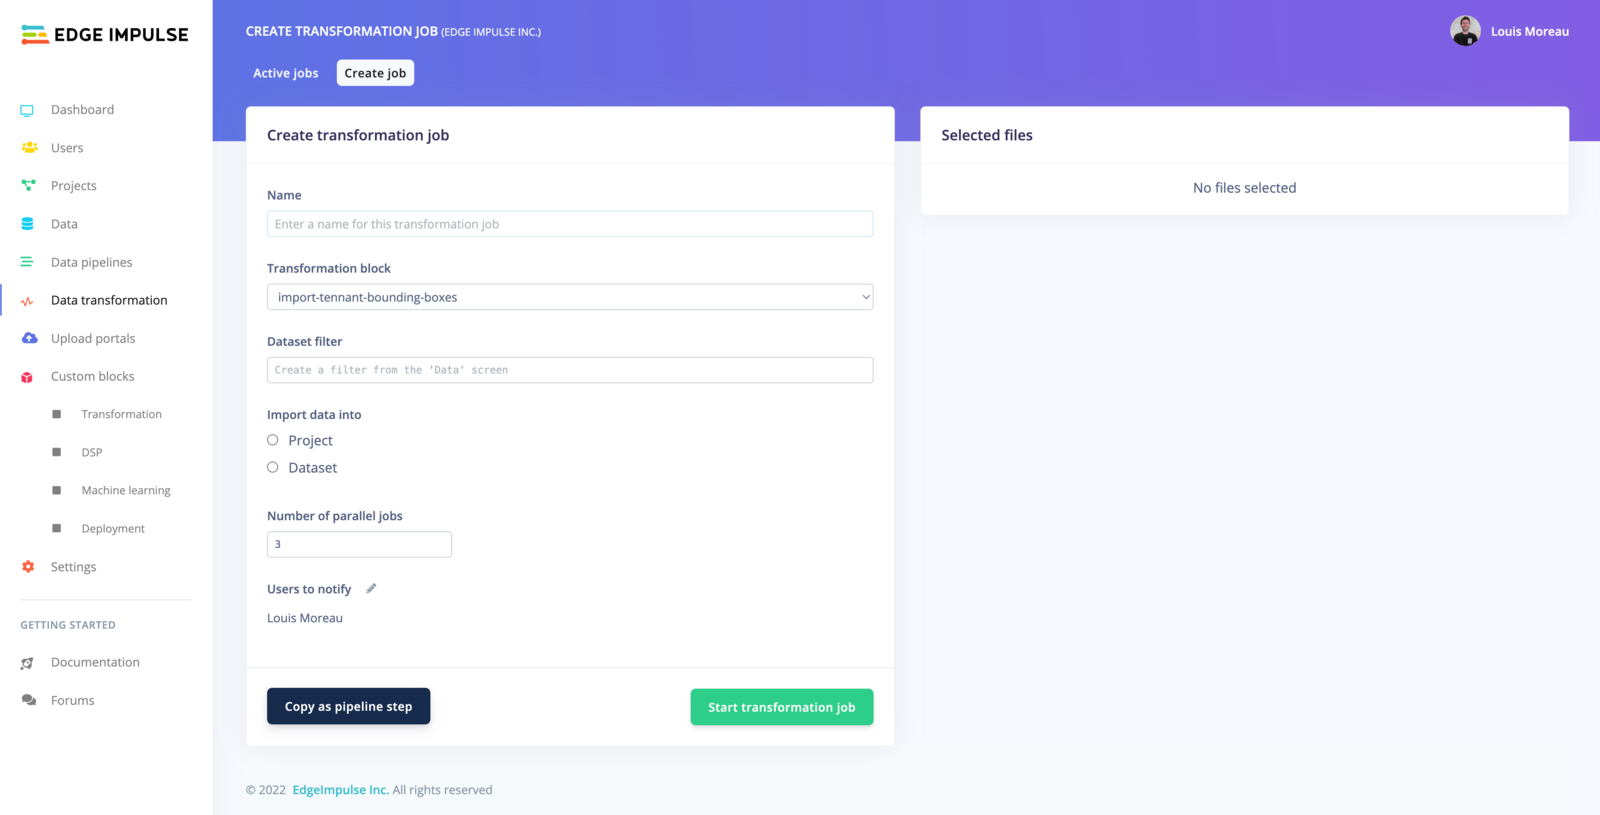
 Select **Copy as pipeline step** and paste it to the configuration json file.
 ## Additional resources
* [Data pipelines](/studio/organizations/data-pipelines) for the organization-level equivalent that can feed datasets rather than projects
* [Cloud data storage](/studio/organizations/data/cloud-data-storage) for configuring bucket credentials
* [Transformation blocks](/studio/organizations/transformation-blocks) for writing a custom step
* [Versioning](/studio/projects/versioning) for what the **Create new version** action stores
## Additional resources
* [Data pipelines](/studio/organizations/data-pipelines) for the organization-level equivalent that can feed datasets rather than projects
* [Cloud data storage](/studio/organizations/data/cloud-data-storage) for configuring bucket credentials
* [Transformation blocks](/studio/organizations/transformation-blocks) for writing a custom step
* [Versioning](/studio/projects/versioning) for what the **Create new version** action stores