> ## Documentation Index
> Fetch the complete documentation index at: https://docs.edgeimpulse.com/llms.txt
> Use this file to discover all available pages before exploring further.
# Run C++ library on SiLabs Thunderboard Sense 2
> Import an Edge Impulse C++ library into Simplicity Studio for Thunderboard Sense 2 inference.
Impulses can be deployed as a C++ library. This packages all your signal processing blocks, configuration and learning blocks up into a single package. You can include this package in your own application to run the impulse locally. In this tutorial you'll export an impulse, and build an application in Simplicity Studio to classify sensor data on the [SiLabs Thunderboard Sense 2](/hardware/boards/silabs-thunderboard-sense-2) development board.
**Knowledge required**
This tutorial assumes that you're familiar with compiling applications with Simplicity Studio. If you're unfamiliar with this you can build binaries directly for your development board from the **Deployment** page in the studio.
**Note:** Are you looking for an example that has all sensors included? The Edge Impulse firmware for the SiLabs Thunderboard Sense 2 has that. See [edgeimpulse/firmware-silabs-thunderboard-sense-2](https://github.com/edgeimpulse/firmware-silabs-thunderboard-sense-2).
### Prerequisites
Make sure you followed the \[Continuous motion recognition] (tutorials/continuous-motion-recognition.md) tutorial, and have a trained impulse. Also install the following software:
* [Simplicity Studio 5](https://www.silabs.com/developers/simplicity-studio).
* Python 3.6.8 or higher.
* Java 64 bit JVM 11 or higher: - available at [Amazon Corretto](https://docs.aws.amazon.com/corretto/latest/corretto-11-ug/downloads-list.html) or [releases page](https://github.com/corretto/corretto-11/releases).
Alternatively you can build this application from the command line or through Docker, see the build instructions in [example-standalone-inferencing-silabs-tb-sense-2](https://github.com/edgeimpulse/example-standalone-inferencing-silabs-tb-sense-2).
### Cloning the base repository
We created an example repository which contains a small Simplicity Studio application, which takes the raw features as an argument, and prints out the final classification. You can either [download the application](https://github.com/edgeimpulse/example-standalone-inferencing-silabs-tb-sense-2/archive/main.zip) or import this repository using Git:
```bash theme={"system"}
git clone https://github.com/edgeimpulse/example-standalone-inferencing-silabs-tb-sense-2.git
```
### Deploying your impulse
Head over to your Edge Impulse project, and go to **Deployment**. From here you can create the full library which contains the impulse and all external required libraries. Select **C++ library** and click **Build** to create the library.
Download the `.zip` file and place the contents in the 'example-standalone-inferencing-silabs-tb-sense-2/ei-workspace/edgeimpulse' folder (which you downloaded above).
### Importing the workspace into Simplicity Studio
With the model downloaded you can import the project into Simplicity Studio.
1. Generate the Simplicity Studio project by opening a command prompt or terminal, navigating to the `'example-standalone-inferencing-silabs-tb-sense-2` folder and running:
```
$ pip3 install pyyaml
$ python3 update-slcp.py
```
1. Open Simplicity IDE and install the Gecko SDK 3.2.x.
2. Create a new project via **File > New > Silicon Labs Project Wizard...**
3. In the New Project Wizard select **Simplicity Studio > Silicon Labs MCU Project** and click **Next**
4. Under 'board' select **Thunderboard Sense 2**.
5. Select the correct SDK you installed in #1 and click **Next**.
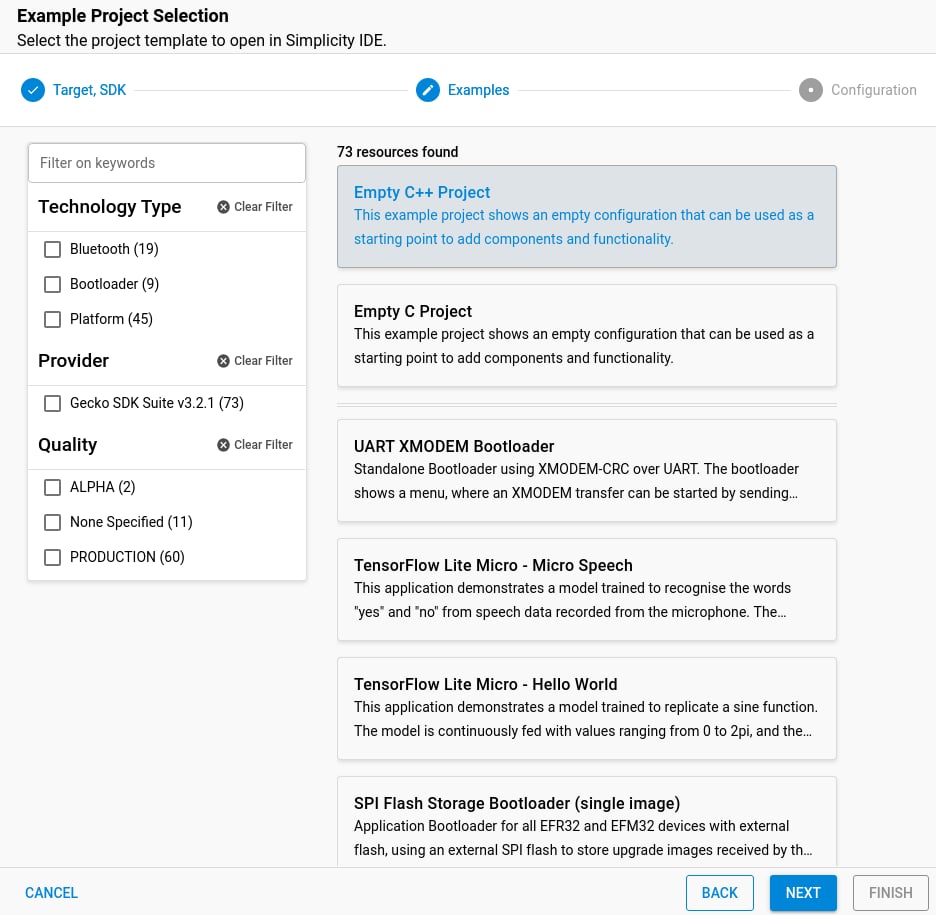
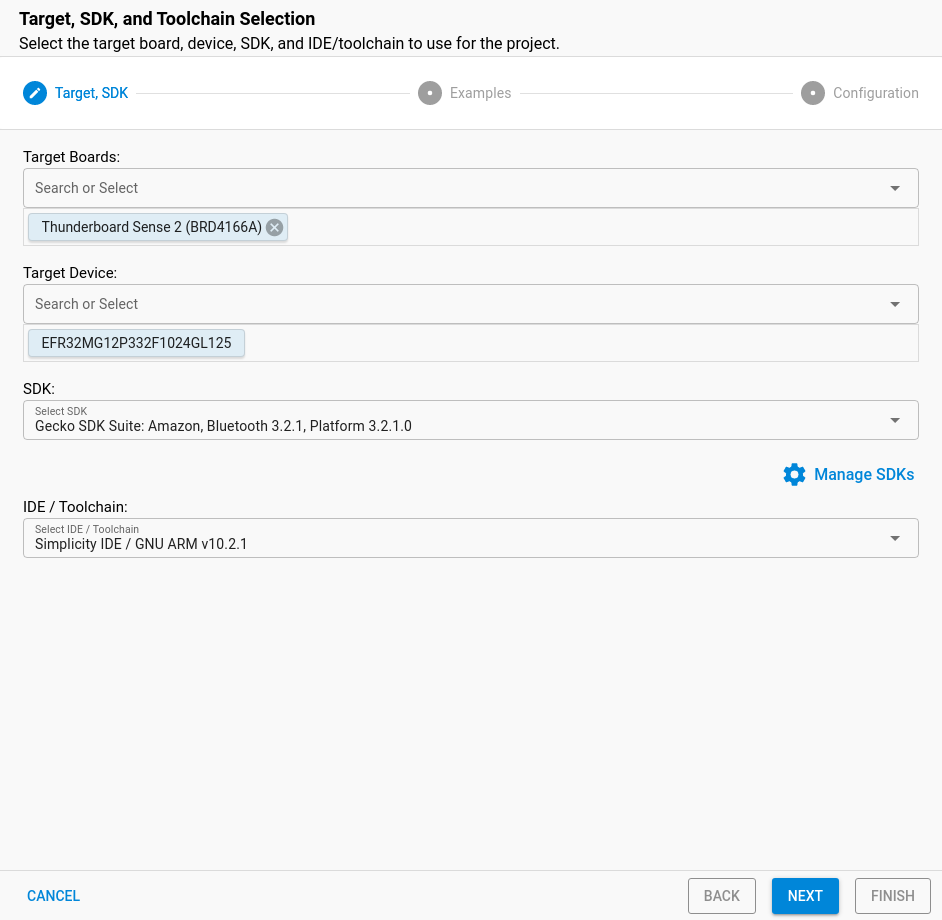 1. Select **Empty C++ Program** and click **Next**.
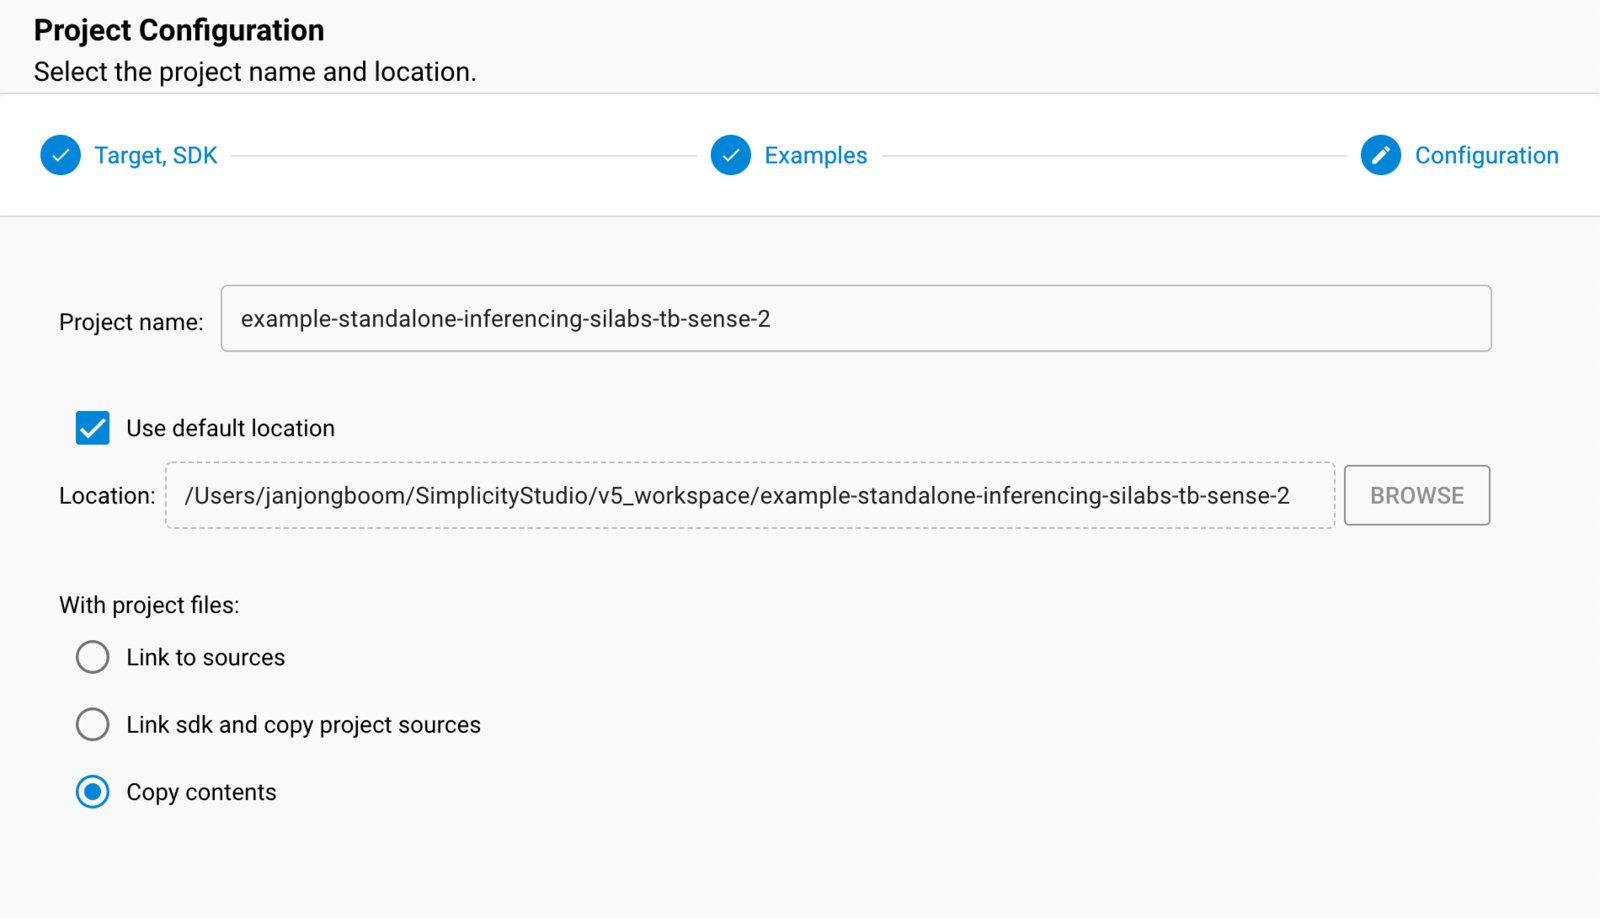
 1. Name the project `example-standalone-inferencing-silabs-tb-sense-2` (exactly this) and make sure **Copy contents** is selected before clicking **Finish**.
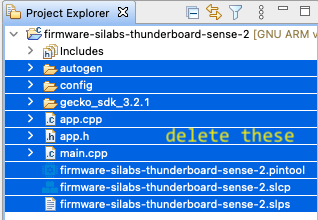
 1. Under 'Project Explorer' select all files, except for *Includes* and delete them:
 1. Then, navigate to the `example-standalone-inferencing-silabs-tb-sense-2/ei-workspace` folder (in this repository), and drag all files and folders into the 'Project explorer' window in Simplicity Studio. When prompted select **Copy files and folders** for this operation.
2. Then close, and reopen the project via: **Project > Close Project**, then **Project > Open Project**.
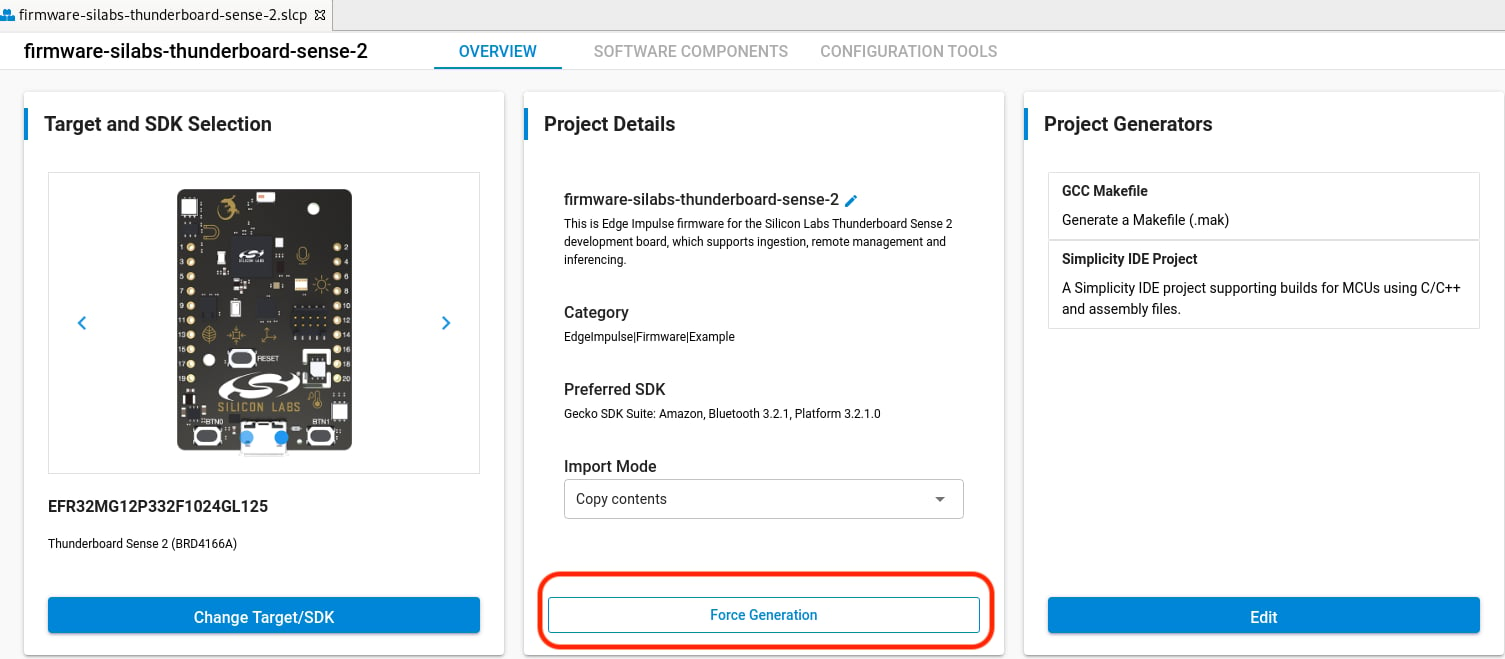
3. Double-click on `example-standalone-inferencing-silabs-tb-sense-2.slcp` to show the Simplicity Configurator.
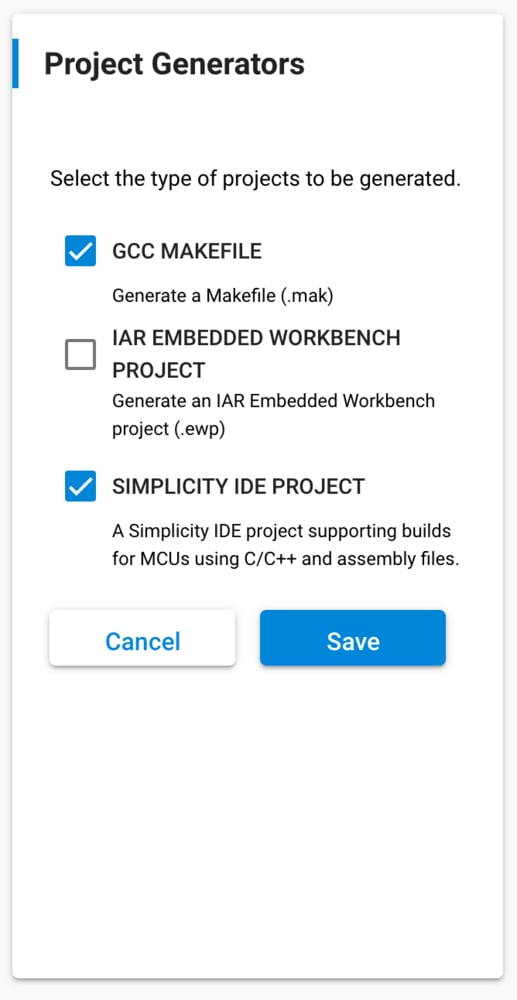
4. Edit 'Project Generators' and disable 'IAR EMBEDDED WORKBENCH PROJECT' (if it's listed):
1. Then, navigate to the `example-standalone-inferencing-silabs-tb-sense-2/ei-workspace` folder (in this repository), and drag all files and folders into the 'Project explorer' window in Simplicity Studio. When prompted select **Copy files and folders** for this operation.
2. Then close, and reopen the project via: **Project > Close Project**, then **Project > Open Project**.
3. Double-click on `example-standalone-inferencing-silabs-tb-sense-2.slcp` to show the Simplicity Configurator.
4. Edit 'Project Generators' and disable 'IAR EMBEDDED WORKBENCH PROJECT' (if it's listed):
 1. Click **Force Generation** to regenerate all links and include paths.
 1. The project is now imported!
### Running the impulse
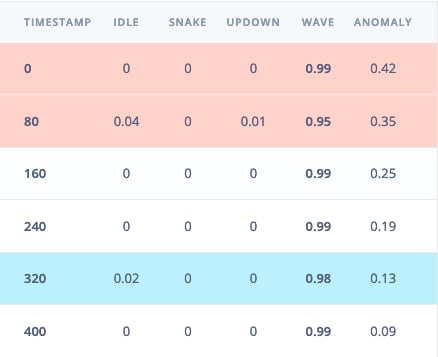
With the project ready it's time to verify that the application works. Head back to the studio and click on **Live classification**. Then load a validation sample, and click on a row under 'Detailed result'.
1. The project is now imported!
### Running the impulse
With the project ready it's time to verify that the application works. Head back to the studio and click on **Live classification**. Then load a validation sample, and click on a row under 'Detailed result'.
 To verify that the local application classifies the same, we need the raw features for this timestamp. To do so click on the 'Copy to clipboard' button next to 'Raw features'. This will copy the raw values from this validation file, before any signal processing or inferencing happened.
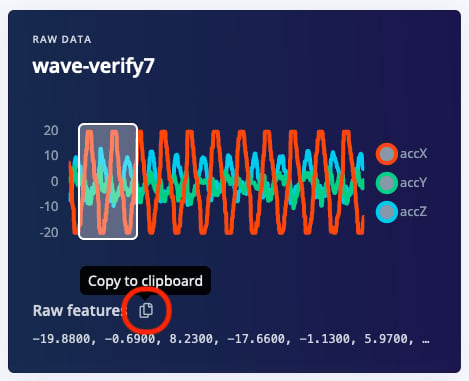 In the example directory open `main.cpp` and paste the raw features inside the `static const float features[]` definition, for example:
```cpp theme={"system"}
static const float features[] = {
-19.8800, -0.6900, 8.2300, -17.6600, -1.1300, 5.9700, ...
};
```
With everything set up, you can now build the application using Simplicity Studio, the command line, or with Docker.
### Building and flashing the application
1. In Simplicity Studio v5, select **Project > Build Project** to build the firmware.
2. Then, right click on the development board in the *Debug adapters* section of Simplicity Studio and select **Upload application**.
In the example directory open `main.cpp` and paste the raw features inside the `static const float features[]` definition, for example:
```cpp theme={"system"}
static const float features[] = {
-19.8800, -0.6900, 8.2300, -17.6600, -1.1300, 5.9700, ...
};
```
With everything set up, you can now build the application using Simplicity Studio, the command line, or with Docker.
### Building and flashing the application
1. In Simplicity Studio v5, select **Project > Build Project** to build the firmware.
2. Then, right click on the development board in the *Debug adapters* section of Simplicity Studio and select **Upload application**.
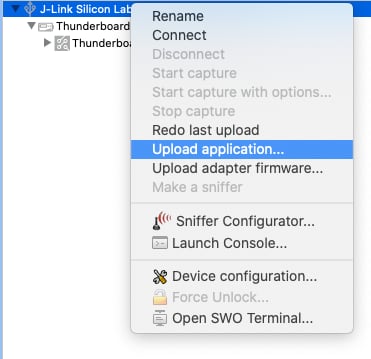 1. Under *Application image path* select the `GNU ARM v10.2.1 - Default/example-standalone-inferencing-silabs-tb-sense-2.bin` file and click **OK** to flash.
(Alternatively you can drag and drop the `GNU ARM v10.2.1 - Default/example-standalone-inferencing-silabs-tb-sense-2.bin` file onto the `TB004` mass-storage device to flash the binary.
### Seeing the output
To see the output of the impulse, connect to the development board over a serial port on baud rate 115,200 and reset the board. You can do this with your favourite serial monitor or with the Edge Impulse CLI:
```
$ edge-impulse-run-impulse --raw
```
This will run the signal processing pipeline, and then classify the output:
```
Edge Impulse standalone inferencing (Silicon Labs Thunderboard Sense 2)
Running neural network...
Predictions (time: 1 ms.):
idle: 0.015319
snake: 0.000444
updown: 0.006182
wave: 0.978056
Anomaly score (time: 0 ms.): 0.133557
Predictions (DSP: 21 ms., Classification: 1 ms., Anomaly: 0 ms.):
[0.01532, 0.00044, 0.00618, 0.97806, 0.134]
```
Which matches the values we just saw in the studio. You now have your impulse running on your Thunderboard Sense 2 development board!
1. Under *Application image path* select the `GNU ARM v10.2.1 - Default/example-standalone-inferencing-silabs-tb-sense-2.bin` file and click **OK** to flash.
(Alternatively you can drag and drop the `GNU ARM v10.2.1 - Default/example-standalone-inferencing-silabs-tb-sense-2.bin` file onto the `TB004` mass-storage device to flash the binary.
### Seeing the output
To see the output of the impulse, connect to the development board over a serial port on baud rate 115,200 and reset the board. You can do this with your favourite serial monitor or with the Edge Impulse CLI:
```
$ edge-impulse-run-impulse --raw
```
This will run the signal processing pipeline, and then classify the output:
```
Edge Impulse standalone inferencing (Silicon Labs Thunderboard Sense 2)
Running neural network...
Predictions (time: 1 ms.):
idle: 0.015319
snake: 0.000444
updown: 0.006182
wave: 0.978056
Anomaly score (time: 0 ms.): 0.133557
Predictions (DSP: 21 ms., Classification: 1 ms., Anomaly: 0 ms.):
[0.01532, 0.00044, 0.00618, 0.97806, 0.134]
```
Which matches the values we just saw in the studio. You now have your impulse running on your Thunderboard Sense 2 development board!